
Sample Chapter: The Product Management Playbook
This is a sample chapter from Julia Barham’s book The Product Management Playbook: Create, Ship, and Optimize Winning Products. 2026, Rosenfeld Media.
Chapter 5
What: Defining Solutions
Product management is a balancing act. You’re expected to represent the voice of the user, while also navigating business realities. You obsess over ways to increase speed to market, while reminding leaders that quality products aren’t born from deadlines. You put in countless hours to become an expert, just to realize how little you really know. After a day of nonstop meetings and context-switching, your brain feels like jelly. (If you don’t have peaceful hobbies outside of this job, I strongly recommend you find some. I garden to stay sane.)
Yes, the life of a PM feels like a tightrope walk, but here’s the honest truth: PMs are always slightly defining the problem and slightly defining the solution even after they’ve officially moved on from problem definition and ideation. That’s because you’re constantly learning what works and what doesn’t by doing.
So, how do you increase the chances you’re solving the right problem, the right way? You use methods that provide directional data to avoid strategic mistakes and plan for multiple rounds of iteration. This is where the trio of ideation, prototyping, and testing methods can help. As I mentioned in Chapter 2, “The Effective Product Manager’s Toolkit,” the elements of product-market fit are like building blocks, and PMs need to align these elements together into a logical structure. If you don’t have a solid grasp of the company objectives, target users, and user needs to serve, then go back and reread earlier chapters. But if the company goal, problem to solve, and customer needs are clear, it’s time to actually do something about it.
When defining solutions, these are the questions you need to answer:
- What solutions solve the target customer’s needs?
- Why would a customer convert to our solution?
- What internal requirements does the company have before launching a solution?
- What is our test plan to validate/invalidate early ideas?
User Experience 101
To create desirable and useful solutions, every product manager should have a basic understanding of user experience, design principles, and partnering with design teams. As the PM, you are the bridge across many functions. The best PMs learn each domain enough to build strong partnerships and elicit the best outcomes from each function on behalf of the company and customer. Consider this next section a mini-orientation in product design.
User Experience Defined
A product’s user experience represents “all aspects of the end-user’s interaction with the company, its services, and its products.” It encompasses the end-to-end user journey with your solution, including how users discover and interact with your products. It goes beyond what users see and includes what users think about your product, how they feel when using it, and how they interact with it.
Crafting a strong user experience requires excellence across many product design decisions, starting with what users don’t see, including strategy, research, and testing, and ending with what users ultimately experience, including interface elements (see Figure 5.1). To do this well, design teams often include many experts that bridge design principles, psychology, engineering, and business expertise to create solutions that win customers and accomplish business goals.
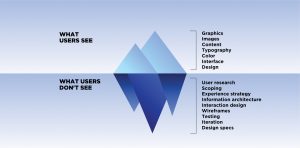
Figure 5.1
The iceberg analogy illustrates many layers and specialties in design that comprise the total user experience.
Ultimately, the user experience represents the choices a product team makes, including what the team deemed important and where the team made shortcuts, concessions, or trade-offs during the product development process. Because the total experience can kill a brand or help it stand out among competitors, exceptional product managers consider user experience as part of the product’s total value proposition.
Common UX Partners for PMs
User experience (UX) is a dynamic profession full of brilliant systems thinkers, visual designers, strategists, and doers. Most companies staff design teams in-house, although job titles vary across organizations. In general, PMs tend to work with these types of roles during the product development process:
- User researcher: These professionals are experts at designing, conducting, and synthesizing research to inform product decisions. They leverage quantitative and qualitative research methods to elicit critical insights about user needs and requirements. They also communicate the results via research readouts and assessments. Many companies have in-house research teams with job titles like UX researcher, user researcher, design strategist, or market researcher. Other companies partner with design agencies to conduct research. If your company has access to user researchers, figure out what methods and tools they use to accelerate product discovery activities.
- UX designer: These experts often work across the entire product life cycle. In smaller companies or companies with limited design support, these roles typically do a bit of everything. Most UX designers conduct some generative and evaluative research, might design prototypes, and often develop detailed mock-ups, wireframes, and specs for engineering teams to follow. They can also establish the information architecture, interaction design, visual design, and style guide used in a solution. Some organizations refer to UX designers as UX/UI (user interface) designers or experience designers, but in general, the responsibility is the same: understand user needs and design usable, desirable, and accessible solutions.
Product managers most frequently work with UX designers. Their well-rounded skill set makes them an essential teammate on durable teams (often referred to as pods, squads, or sprint teams) where the product manager, designer, and tech lead form a cross-functional leadership trio for multi-month initiatives. To be clear, designers don’t work for you, they work with you—so treat your design partner like a co-equal. On high-performing teams, the product manager, design lead, and tech lead align on purpose, team operating model, and plans to deliver solutions in-market. - Content strategist: These specialists use the transformative power of words and content to communicate your brand ethos, influence user behavior, and provide much-needed clarity to customers. Sometimes referred to as UX writers, they ensure that the language across your product is clear, usable, and effective at helping users complete tasks. In companies where content is the product, content strategists take on a much larger role, often determining the content management model, including what content is generated, the process used to create and ship it, and how content is maintained.
PMs should engage content experts during the initial design phase of a product to determine the optimal language in navigation menus, error messages, customer email communications, and critical user flows such as onboarding or renewals. PMs can also request content audits and experimental ideas from content strategists to improve usability and product adoption metrics once the product launches.
Requesting Design Support
A company’s operating and staffing models usually dictate how and when product managers engage with design partners. On some initiatives, the product manager may have a consistent design partner embedded in the day-to-day work. On other projects, PMs must request design support on an ad-hoc basis. If your company has access to user researchers and designers, figure out how they staff and support projects.
Many design teams ask PMs to complete a “UX Project Brief” (see Figure 5.2), in order to gather details about the initiative so they can prioritize design resources appropriately. Companies often staff fewer UX roles than product managers, so you should complete this immediately and be prepared to justify the importance of your initiative. Also, be sure to include the opportunity size using dollar values when you submit the brief. If you already completed the business strategy workshop and problem statements from Chapter 3, “Why: Defining the Problem and Opportunity,” filling out a UX Project Brief should be easy.
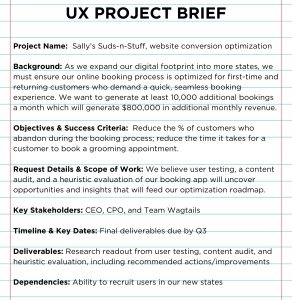
Figure 5.2
Including the opportunity size in a UX Project Brief helps design leaders prioritize staffing decisions.
Usability Heuristics, Design Principles, and Design Systems
A great product strategy poorly executed won’t impress your customers if they can’t use the product. Remember, usability is a non- negotiable quality of successful products. Fortunately, teams can set themselves up for success by following common usability heuristics, establishing clear design principles, and embracing design systems.
Usability Heuristics
Usability heuristics, or best practices, offer common guidelines that help teams create solutions that customers can use. Whether you have a design partner or not, product managers should understand common usability heuristics. This knowledge will help you assess your own product, build prototypes for testing, conduct competitor teardowns, and use the right language when communicating ideas to design partners. Refer to Figure 5.3 for 10 heuristics popularized by early usability pioneers like Jakob Nielsen and Rolf Molich.
For the most part, heuristics are consistent across UX educators. There are a lot of graphics out there, but they are all similar flavors of the same 10 heuristics.
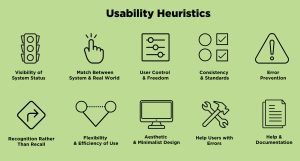
Figure 5.3
Heuristic analysis is a low-cost, high-impact technique to identify usability issues with your solution.
Design Principles
Design principles represent a company’s values when it comes to product design. These principles help distinguish your product from competitors, communicate how the design should feel to users, and drive trade-off decisions when the team is evaluating different concepts to solve a problem. For example, a company’s design principles could be the following:
- Effortless experiences that minimize the cognitive load on the end-user
- Efficient workflows that reduce the time it takes to complete a task
- Intelligent experiences that prioritize human-like guidance or expert advice for complex decisions
- Inclusive design that emphasizes accessible solutions for all
- Ethical experiences that respect the security and privacy rights of our users
If your company staffs an in-house design team, you may already have a set of design principles and guidelines to follow, so ask around. You can use them to ensure that the product stays on-brand with company expectations.
Ethical Design
Ethical design is everyone’s responsibility when building products. And it’s not just about avoiding harmful practices that make tasks like cancellation harder for customers. Ethical design means proactive consideration for users and their rights, including privacy, security, inclusivity, transparency, accessibility, and well-being. Take Apple for example. They don’t just follow privacy laws—they’ve made privacy a core aspect of their products, proving that ethical design can be a competitive advantage.
While ethical design practices apply to all products and solutions, this is an especially important topic as automated and algorithm- driven systems power user experiences with minimal human oversight. In Chapter 6, “How: Defining the Approach,” you’ll find tools and questions to help teams define and assess ethical guardrails during product development, along with strategies to implement feedback loops and decision checkpoints. PMs can also take this one step further by embedding ethical design guidelines into product requirement documents.
Design Systems
Design systems are essential for scaling products and platforms to millions of users. Design systems provide reusable standards and code components to ensure that delivery teams maintain consistency within and across products. For example, color palettes, icons, page layouts, interaction patterns, code snippets, typography and more all live within a design system, typically located in digital libraries that designers and developers access.
As a PM, it’s important to leverage and adhere to design systems to ensure usability and brand integrity. In addition to providing brand and experience consistency for end-users, they also help product teams ship faster and manage partner integrations. Product managers that own and maintain B2B or B2B2C platform solutions often publish design systems with their product documentation so partners understand exactly how to integrate it with their ecosystem. For example, companies like Spotify, Uber, Google, and Apple all publish design system guidelines for millions of engineers to follow, as shown in Figure 5.4.
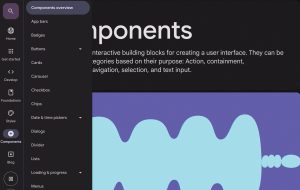
Figure 5.4
Google’s design system is a well-documented guide that helps platform teams ensure consistency for users and the company’s brand.
Continuing Ed
Even if you have the best design partners, accountability for a solution’s success or failure often rests with the product manager. Do yourself a favor and stay curious about design practices. Thankfully, there’s a vibrant online community of experts and thought leaders eager to help you succeed. And, if you’re flying solo without an in-house design team, developing expertise in this field is essential. In that scenario, you generally have three choices:
- Learn more about research and design on your own. There are zillions of bootcamps, books, blogs, and online communities that can help you dive in. The absolute best authority on research and design is the Nielsen Norman Group.
- Find a surrogate at your company who has a similar skill set to design. People with titles like UX engineers, product marketers, or market researchers might be useful substitutes until you have official design support.
- Ask for funding to hire contractor support. (This usually takes too long and doesn’t get approved if it’s an unexpected expense, but it never hurts to ask.)
Note: Useful Design Resources
The design community produces excellent literature, case studies, and resources to upskill practitioners around the world. Start learning more by exploring these books, thought leaders, and websites:
- The Design of Everyday Things by Don Norman
- Don’t Make Me Think by Steven Krug
- Rocket Surgery Made Easy: The Do-It-Yourself Guide to Finding and Fixing Usability Problems by Steven Krug
- The Rosenfeld Media book library at https://rosenfeldmedia.com/books/
Play 7
Generating Solution Ideas
What solutions solve the target customer’s needs?
After user research, teammates often jump straight to solutions.Sometimes, it’s reasonable to fast-track obvious fixes and add a ticket to the development team’s backlog. For example, if research indicates the navigation menu has a confusing label or you discovered a critical bug, engage an expert and resolve it quickly. You don’t need to define, ideate, prototype, and test every change or minor adjustment.
However, when the right solution isn’t clear and the cost of being wrong is high—such as a major redesign, platform migration, or product launch—you should leverage ideation, prototyping, and testing methods first. In these cases, you should explore multiple solutions before converging on a decision. On some teams, the design leader may schedule and facilitate an ideation session, but if you’re unsure, or if you don’t have a design partner, then you’ll need to take the lead. (Someone has to!) Here’s how to host one.
Use When
You’ve just wrapped up user research and need to generate testable solution ideas.
Average Time
- 2 hours to prepare
- 2.5 hours to host and synthesize ideas
Try This
1. Select an ideation method.
The purpose of brainstorming or ideation sessions is to generate as many divergent ideas as possible before selecting which ones to test. Initially, the team should aim for quantity of ideas over quality of ideas. Like synthesis, this isn’t an exact science, but there are plenty of useful methods to follow. Here are some of my favorite approaches from the Interaction Design Foundation.1 Pick just one for your session.
- Brainstorming: A technique that leverages the collective thinking of the group by engaging with each other, listening, and building on others’ ideas.
- Braindumping: A technique where individuals silently write down all of their ideas and share them one-by-one in a group setting without discussion. This method is intended to get everything out on the proverbial table before debating ideas.
- Brainwriting: A technique where participants write ideas onto cards and then pass their idea cards on to the next person, moving those cards around the group in a circle as participants build on the ideas of others. Think of this as a “yes, and” exercise. It helps the team take a more collaborative approach and forces participants to consider others’ ideas.
- Brainwalking: A technique that emphasizes movement during the ideation session and gets participants moving around the room to review and build on others’ ideas.
During each technique, participants generate visual stimuli — typically sticky notes — to jot down and share their ideas. Keep in mind, others may prefer drawing or creating diagrams to communicate ideas. Either way, ensure that the environment is conducive for collaboration. If it’s in-person, make sure that the room has useful materials (i.e., a white board, markers, sticky notes, etc.). If the session is remote, ensure that your participants have access and permissions to the digital tools you plan to use. (Tip: If you need to host remotely, the first three techniques can be done in-person or remotely with tools like Miro and FigJam.)
2. Schedule and prep for the session.
After deciding on the format, it’s time to start prep work. Skipping this step will lead to a poorly run session and a potential brand issue for you, especially if you’re inviting influential stakeholders. (Alternatively, this could also be a chance to demonstrate strong communication and collaboration skills.) Become a master at facilitating these and set yourself up for success by doing this ahead of time:
- Schedule the session in advance and invite a diverse group to participate. In addition to your everyday partners, it’s important to invite key stakeholders and people with diverse perspectives. This could be senior leaders, your boss, customer service reps, or anyone with expertise in your problem space.
- Identify a co-host for the session. It’s hard to host and participate at the same time. It’s also helpful to have an extra hand when “technical difficulties” occur or participants need support during the session. Make sure you’re able to participate by finding a co-host and including them in prep work.
- Create an agenda. Ideation sessions are usually 30–60 minutes and include multiple rounds of idea generation. Set a clear agenda with timeboxed increments to ensure that the group has enough time for silent work and group discussion.
- Draft prompts to structure the ideation rounds. This is by far the most important part of prep. The group will need context and prompts to inspire and guide them. You can do this by drafting “How might we” statements based on the user needs, pain points, or underserved jobs-to-be-done you want to address. Here are a few examples:
- “How might we reduce the time it takes for patients to book a same-day appointment with their doctor?”
- “How might we increase customer trust when submitting payment method information during the checkout process?”
- “How might we maximize customer confidence when choosing their annual benefits package during open enrollment season?”
- “How might we increase the speed at which we can integrate with third-party partners?”
- “How might we decrease the percentage of new customers who call in to speak with a customer service representative?”
- Document ground rules. Groups don’t always behave like you expect them to, so define ground rules for the session. Ground rules could be something like “refrain from judging or shutting others’ ideas down,” “no interrupting while others present ideas,” or “stick to the prompts so we collect relevant ideas.”
- Confirm the ideation environment is accessible and easy to use. Some participants might join remotely while others might show up in person. Prepare an agenda that works for both groups. If you have remote attendees, test out tool permissions in advance.
3. Host the session.
Ideation sessions are invigorating, collaborative sessions. Assuming prep is complete and your participants do show up, it’s time for the fun to begin. During the session, follow these steps.
- Set expectations. Share the agenda, ground rules, and purpose of the meeting. And stick to the plan.
- Offer context on the problem or opportunity. Provide the original problem statement to the group and explain the opportunity you want to solve for the company and target customer. Then share user research findings, including the top user needs you discovered, critical pain points, and current workarounds. (This should be easy-peasy if you completed Play 6, “Sharing Research Readouts,” in Chapter 4, “Who: Defining Customer Needs,” after user research.)
- Start ideation rounds. Before each round, review the “How might we” prompts you want the group to follow. During the round, use a timer to stay on track.
- Review ideas, discuss, and iterate. After each round, review and discuss the proposed ideas. Ask clarifying questions, if needed.
4. Group ideas from the session.
After ideation, group similar ideas to identify common themes and distinct hypotheses. This clustering activity helps organize ideas that span different aspects of a solution. For example, some ideas might represent an overall value proposition, while others represent specific features or even improvements to the business model. To help with this, consider mapping ideas into these buckets:
- Distinct value propositions
- Discrete features or capabilities
- Unique design principles or brand principles
- Customer service changes
- New business models or pricing models
- Changes to profitability levers
- New ways to distribute or position the solution
- Business process changes
5. Prioritize ideas for testing.
After grouping, select the ideas that you will prototype and test. Many teams use an impact-effort matrix to prioritize concepts, as shown in Figure 5.5. Using this matrix, plot ideas based on their effort (the level of effort it takes to deliver the solution in-market) and impact (the solution’s assumed value for your company or customers). After you plot the ideas in this matrix, focus on delivering quick wins and big bets. Quick wins typically don’t require testing because effort is low and impact is high. However, you should test ideas that fall within “big bets” before making a large investment in the solution.
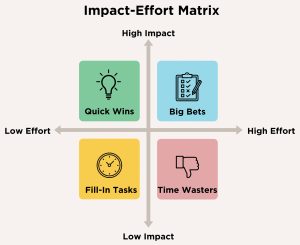
Use the impact-effort matrix to plot hypotheses in the correct bucket after ideation.
Assumptions Mapping is an alternative technique you can use to prioritize hypotheses for testing. In this method, you’ll plot hypotheses on a 2×2 matrix where the Y-axis represents how important the hypothesis could be to customers or company, and the X-axis represents how much knowledge or evidence you have about the hypothesis (see Figure 5.6). This method comes from David J. Bland’s Assumptions Mapping technique. When using this method, David recommends testing hypotheses that fall in the upper-right quadrant, known as “leap of faith” assumptions to minimize company risk while pursuing high-impact solutions.
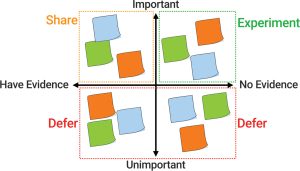
When using the Assumptions Mapping technique, test hypotheses that fall in the upper-right quadrant.
Pro Tip — Test Three Ideas or More
Regardless of which prioritization exercise you follow, pick at least three options to test so that you have hypotheses to compare during testing. This will improve the quality of customer feedback and learnings you uncover during concept testing rounds.
Play 8
Testing Product Concepts
What solutions solve the target customer’s needs? Why would a customer convert to our solution? What is our test plan to validate/invalidate early ideas?
Concept testing is an exciting moment in the product development journey. It’s when you finally get to create something with all the user research you uncovered and assess how well it solves the problem statement that keeps nagging at you. Once again, you don’t need to test everything. But when the cost of making a wrong choice could result in financial risk, brand risk, negative customer impact, or metrics that move in the wrong direction, then it’s time to run a test.
There are plenty of ways to design experiments and learn what customers do when given a solution or why they do it. For example, product teams can do the following:
- Show simple sketches or paper-prototypes to users.
- Run a quantitative survey that asks users to rank unique value proposition phrases, images, or videos that describe a new solution.
- Ask users to create their own product by presenting a set of discrete value proposition statements and features on flash cards and then ask users to create their ideal product.
- Present a high-fidelity mock-up or clickable prototype that introduces a new website or app to users.
- Launch a fake-door test (a live landing page for a product that doesn’t yet exist) and measure how many visitors sign up or demonstrate demand.
- Run a sequence of multiple experiments that use the different methods in bullets above and consolidate learnings across each to form a cohesive product strategy.
If you’re testing enhancements to an existing product or platform, you may have better options available to you, including A/B testing or multivariate testing. (For details on that method, check out Chapter 10, “Managing Products In-Market,” which includes techniques to optimize in-market solutions.) In this method, we’ll explore the basic steps of concept testing to assess hypothetical value propositions and feature sets with users.
Use When
- You have an early-stage product idea that requires additional validation before making a big investment to build it.
Average Time
- 5–10 days, including test design, building a prototype, running research, and analyzing results
Try This
1. Clarify the goal of your test.
Before testing a product concept, ensure that you have a clear list of user needs or problem statements and a corresponding set of hypotheses to study. Then clarify exactly what you hope to learn in the concept test. Most concept tests aim to answer the research questions shown in Table 5.1.
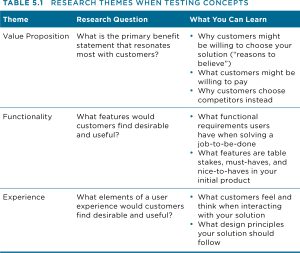
A word of caution here — don’t jam too many variables or hypotheses into one test. Once you start co-mingling hypotheses in an experiment, it’s nearly impossible to understand how each hypothesis performed and why. If you’re testing more than two elements in the table, break the test into multiple tests to improve your learnings.
2. Determine key metrics.
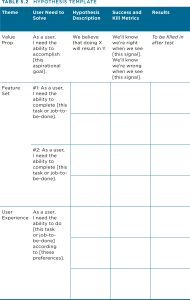
Now it’s time to apply rigor and determine what must be true to call your hypotheses a success or failure. At this point, you may have many hypotheses or just a handful. Either way, clearly document them in the same format and keep track of them in one location. Table 5.2 shows a simple template you can build to consistently frame test language across user needs, corresponding hypotheses, and metrics. (If you don’t know which metrics to list, skip this step but come back and complete it after you select the research method. Metrics may depend on the method. For example, if you are running a survey, you could measure success based on importance and satisfaction scores or concept rankings. If you are running a qualitative study, you may ask a smaller number of customers to force rank or vote on ideas.)
Pro Tip — Use Kill Metrics as Permission to Fail
Your test plan should specifically list what success and failure look like. Too many teams miss this part. If you’re only looking for positive signals, you might fail to realize the outcomes are only incrementally better, flat, or even downright negative. Deciding what a failed outcome looks like before you start testing helps the team pivot when needed.
3. Pick a testing method.
There’s no singular way to test a new product concept. You can test concepts using low-fidelity, scrappy sketches (see Figure 5.7), different image treatments (see Figure 5.8) or stretch for high-fidelity, clickable prototypes. If you’re not sure what methods and tools are available at your organization, check with your partners in research and design. Consider trying the methods listed at the beginning of this play or some of the research techniques listed in Chapter 4. If you’re struggling with this part, here are a few tips to land a decision and prepare for testing.
- Pick a method that will allow you to test competing hypotheses at once. Don’t mix methods or test across different timeframes with different users — this will muddy your data. Also, consider whether you want to include or exclude your company’s brand from the concept based on your learning objectives.
- Ensure that you have a plan to collect, review, and analyze data before you launch the test. If you’re using a qualitative method, consider ways to add some rigor. For example, you might consider gathering numerical data by asking participants to force rank or vote on concepts to understand relative performance of one concept over others.
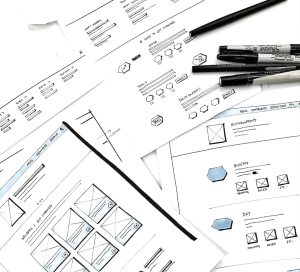
Figure 5.7
Paper prototypes are a low-cost, low-effort way to get rapid feedback from users.

Figure 5.8
SurveyMonkey provides quantitative methods to assess value proposition statements, logos, and images, as seen in these test ads.
4. Create prototype(s).
Make sure to partner with researchers, designers, or engineers to build the prototype. If you’re testing multiple hypotheses, allow your team time to design, iterate, and finalize distinct versions. Remember, it’s good to test multiple hypotheses — just don’t bundle them all in the same concept. For example, make a unique concept for each value proposition and present both to users. For rapid prototyping and testing, try out the tools listed here:
- Prototyping tools: Cursor, Lovable (shown in Figure 5.9), Claude Code, Replit, Figma, Miro, Canva
- Survey tools: Typeform, Google Forms, SurveyMonkey
- User research platforms: UserTesting, User Interviews
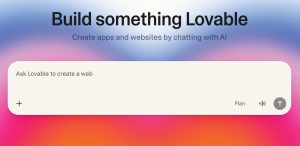
Figure 5.9
Generative AI tools, such as Lovable, can accelerate the prototyping process and supplement teams without design support.
5. Run the experiment.
While some methods vary, generally speaking, you’ll need to recruit users, deliver the test, and collect feedback. Reuse some of the plays from Chapter 4 to design, execute, and synthesize research results. That said, here’s additional advice when testing concepts:
- Set expectations. Let participants know they will see multiple concepts during the session.
- Reduce bias. Randomize the order in which participants see concepts.
- Verify data collection. Confirm that your collection tools work immediately after launch. This is especially important for digital tests or surveys.
- Maintain consistency. Avoid mid-test adjustments. If you need to change concepts, reset the test and use post-reset data.
6. Analyze results and determine next steps.
When you have enough data to draw conclusions, review the results. Start by filling out the results column in Table 5.2 and capture critical learnings. Then pull the team together and review these questions:
- Overall findings: What concepts performed well and which ones didn’t? What does the data tell us about the overall concept performance and individual hypotheses?
- Target user findings: Did we uncover new needs about our target user? Did we identify any new segments or categories of users based on these needs?
- Value proposition insights: What benefit statements resonated and which ones didn’t? Does it vary by user?
- Feature set insights: What did we learn about each user success criteria? What functionality is table stakes, nice-to-have, or not needed? Does it vary by user?
- Experience insights: What design treatments or design principles must be true to satisfy user preferences?
- Iteration plan: What could we add, change, or remove to improve the perceived desirability and utility of our proposed solution?
- Next steps: Do we have enough information to begin drafting solution requirements or should we run more tests to gather more data?
If the concepts didn’t perform well or you want additional data before making a big investment in a new solution, plan for future tests and start this method over. Most teams do several rounds of concept testing and experimentation before they have enough feedback to draft solution requirements and nail down the initial feature set. That said, once your concept feedback is actionable and ready for the next step, continue with the next method.
Learn More — Consumer Preferences Through Surveys
If you really want to geek out on data-driven concept testing, there are two additional survey methods you can explore, both based in market research practices:
- MaxDiff surveys, a survey method which asks users to rate best and worst options when presented with a given set of choices to assess trade-offs and preferences
- Choice-Based Conjoint analysis, a survey method which asks users to choose their preferred products and product attributes over a series of questions meant to mimic real-world trade-offs
Play 9
Building a Problem-Solution Fit Map
Why would a customer convert to our solution? What solutions solve the target customer’s needs? What internal requirements does the company have before launching a solution?
After testing concepts, you’ll have a strong sense of problem-solution fit — evidence that your proposed solutions address customer needs. (Product-market fit occurs later when you have evidence that customers will pay or adopt your solution.) This is a major milestone because it means you’re ready to start translating the collective intelligence into product documentation.
Product documentation helps you distill product direction, scale knowledge about user needs, and maintain alignment as teams transition from discovery to delivery. As a PM, the most important documentation you own will be the product vision, product strategy, product roadmap, and requirements (covered in later chapters). But after wrapping up product discovery, you often need something lighter and action-oriented to help stakeholders understand product direction, including user needs and business needs.
Here’s a method I use to create a simple, high-level product blueprint. It’s not a substitute for formal product requirements, but it can help stakeholders quickly understand priorities and scope.
Use When
- You need to distill research insights and communicate the high-level direction and scope for a new product or solution.
Average Time
- 2–8 hours, depending on the scope of the problem
Try This
1. Assemble learnings about problem-solution fit.
Using prior artifacts and research readouts, compile and organize insights and decisions that answer the following questions:
- What is the high-level goal you are solving for customers (the main job-to-be-done)?
- What is the new value proposition your company should offer to accomplish the goal?
- What are the critical user needs to address in priority order?
- What features will address each need?
- What preferences do users have about the overall experience in priority order?
- What are the key design principles that will accommodate these preferences?
- What is the rationale for each decision above?
- How do these decisions compare to competitors and existing solutions?
2. Identify business requirements that must be true for products to launch.
Companies usually expect teams to meet specific criteria when launching a new product or system. For example, your company may require certain functionality to track analytics, stay compliant, or even recover from an outage. These qualities are nonfunctional requirements (NFRs) that help prevent or reduce risk when a solution is live. NFRs cover various categories as depicted in Table 5.3.
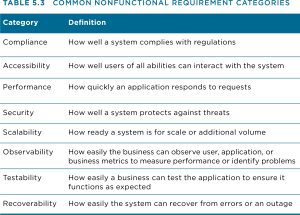
NFRs are business requirements (not customer requirements), and PMs must include them in early product documentation to inform scope, estimates, and roadmap conversations. To identify nonfunctional requirements, ask your team, leader, or engineering partner if your company has existing standards, such as a “Definition of Done” or “Enterprise NFR” policy. Otherwise, pull your team together and identify essential criteria that must exist before you launch a solution.
3. Organize everything into a Problem-Solution Fit Map.
A Problem-Solution Fit Map is a quick way to visually display what your solution should offer, including the value proposition, the key features, user experience guidelines, and business requirements. Consider this a companion document to the problem statements, personas, user research readouts, and concept testing results you’ve already captured.
Many teams use a formal product requirements document to detail specific behavior about each solution, feature, and requirements (and I suggest you do the same). However, if you need a visual aid to quickly show the puzzle pieces of your solution and how they fit together, try filling out the Problem-Solution Fit Map as shown in Figure 5.10.
When communicating a new feature set and scope, the most important part is showing stakeholders how the problem space (target user and user needs) connects to the solution space (value proposition, features, UX guidelines, and business requirements). Be specific and include evidence or rationale to help stakeholders quickly understand why and how you formed the overall solution recommendation. Use priority labels to show teams the difference between a Day 1 requirement versus functionality you can add later.
You may need to adjust the Problem-Solution Fit Map to communicate your unique opportunity. If you’re launching a brand new solution, you’ll need to list many more features. Or, if you’re serving multiple market segments, label which solutions and guidelines apply to different users.
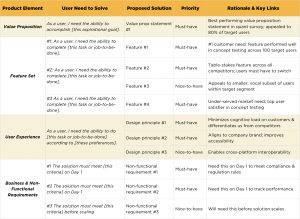
Figure 5.10
Build a Problem-Solution Fit Map to visualize the puzzle pieces of your solution and socialize with stakeholders.
Pro Tip — Writing User Need Statements
There are different ways to represent user needs in product documentation. Regardless of the format, aim for consistency. Here are common formats you can test out:
Problem-centric:
- As a user, I need the ability to complete [this task or job-to-be-done], so that I can [accomplish this expected outcome].
- As a [describe target user/stakeholder], I need a way to [describe task/job-to-be-done], so that [describe goal/desired outcome] occurs.
Solution-centric:
- A [user] needs a [feature/solution] in order to [accomplish/complete task].
- Given [this circumstance occurs] when [this user] performs [this action] then the system should [respond in this way].
4. Start sharing with partners and stakeholders.
After you draft the Problem-Solution Fit Map, it’s time for a reasonability check with your team and stakeholders. Here’s what to do:
- Pressure test the logic. Share the Problem-Solution Fit Map with partners and stakeholders. Invite them to poke holes and ensure that the logic holds up.
- Identify the big rocks and dependencies. Call out features that might require new capabilities or high levels of effort. Start listing potential dependencies on other teams, tools, or partners to avoid surprises later.
- Explore scoping options. Your MVP goal should be learning, not scaling. Look for ways to keep scope tight.
As you gather feedback from partners, find ways to track frequently asked questions and improve your overall documentation. These come in handy during feasibility assessments and major planning milestones.
Pulling It All Together
Product managers can’t spend endless weeks overanalyzing problems because businesses actually want you to do something about them. Facilitating ideation, testing concepts, and assembling a Problem-Solution Fit Map helps you cross the chasm from defining problems to defining solutions using evidence-based techniques to validate or debunk assumptions. And user experience partners, guidelines, and systems accelerate your ability to deliver a useful solution.
The knowledge and methods in this chapter can certainly help you identify how to make a solution desirable and usable, but you haven’t covered feasibility yet, which is where the rubber meets the road and constraints emerge. The next chapter covers tips to assess and fold in feasibility so you can (finally) crystallize the product strategy, roadmap, and vision.


